
We had a lot to celebrate this week here at Macaroni KID New Iberia. Not only was it my birthday, but I am also celebrating two years of being the Publisher for Macaroni KID New Iberia!
This week our biweekly segment with The Morning Show on News 15 featured this fun, easy Birthday Cake Gift Box craft. It is the perfect craft for kids to make their gift giving a little more special. You can do it for birthday celebrations, anniversaries, or any celebration with gift giving.
 Image by Tracie Ysaguire Image by Tracie Ysaguire |
I found out earlier this month that Adam Olivier was also celebrating a birthday this month, so I knew this birthday craft would be the perfect thing for us to do with Alex on our crafting segment.
Alex and I were covered in paint, but it was worth it to be able to surprise Adam with a little gift inside of our Birthday Cake Gift Box. Check out the photos below from our Facebook page:
Who doesn't have boxes around the house that they never know what to do with? We always seem to accumulate a new stack of them even after we clean up.
You can use different sized boxes from around the house to create this "cake" gift box. Anything from delivery packages, to cereal boxes, snack food boxes, or even small jewelry boxes. This craft allows you to create a one of kind gift box to surprise your loved one with that special gift.
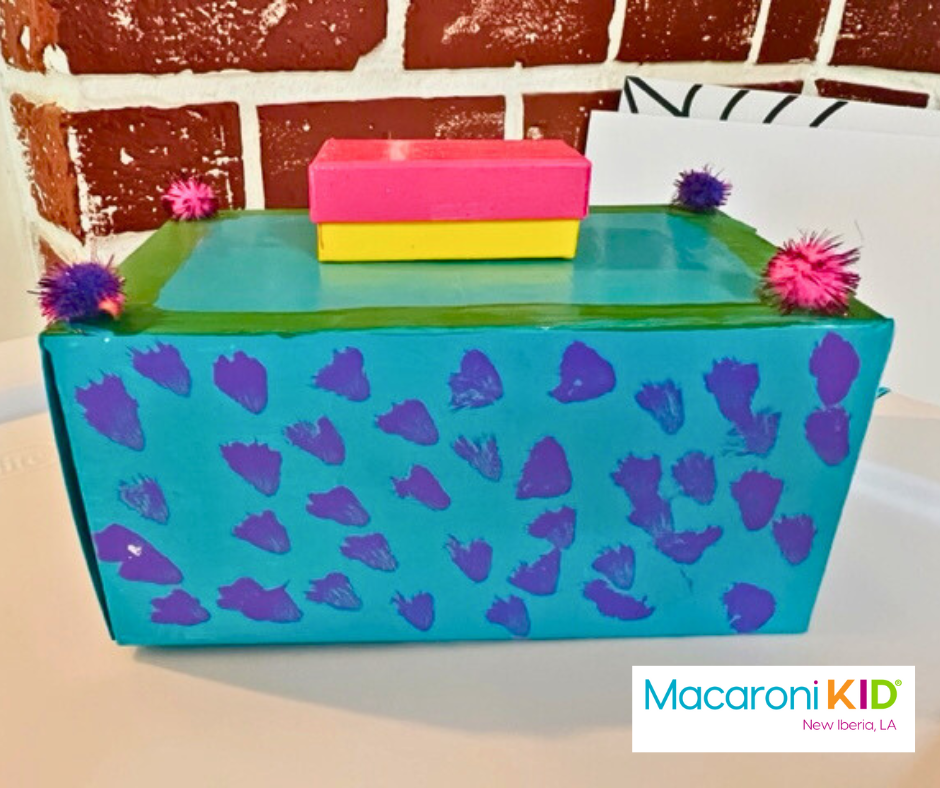 Image by Tracie Ysaguire Image by Tracie Ysaguire |
Birthday Cake Gift Box
What you need:
- Empty cardboard boxes of all sizes (shoeboxes, cereal boxes, Amazon boxes, etc.)
- Paint and paintbrushes
- Pipe Cleaners and/or pom-pom balls
- Stickers or other small craft items
- Scissors and scotch tape
- Glue and/or Mod Podge
- Construction Paper and/or tissue paper
- Clean up supplies
Instructions:
Pick your boxes according to the size of the gift you want to hide inside. You can make a two stack or even three stack of boxes if you choose. For the boxes in this craft that will be empty, I recommend stuffing them with tissue paper or other crumbled up paper to give them a little weight that will allow the stack to hold steady.
Once you have your boxes selected, you can begin painting them. For some boxes, you may need to paint them with two or three coats of paint to cover up any writing or images.
Also, if there is any tape on the boxes, I would remove as much as you can. Paint the box that will be the bottom of your cake first. While that is drying you can paint the other box or boxes. Let all your boxes dry before you begin adding any other decoration.
Now that all your boxes are dry, you can create your "cake" stack. We used a combo of glue and Mod Podge to put our boxes together. Once we had our stack created and the boxes glued to each other, we let that dry.
This is where you get creative! We decided to add some cute, sparkly pom-pom balls to our cake, as well as glitter glue, sequins and pipe cleaners. There are no rules here!
Let all your decorated boxes dry. Once all your decorations are dry, you can add candles if you decide to. We used pipe cleaners and some bright, orange fuzz from one of the pom-pom balls as our flame. You could also cut out flames from construction or tissue paper and glue them to the pipe cleaners.
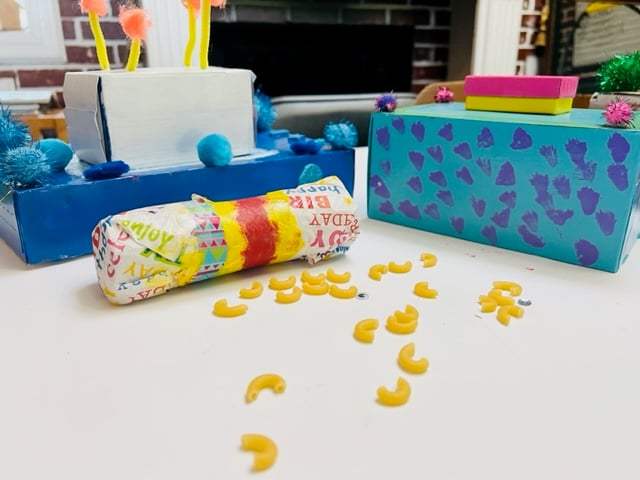 Image by Tracie Ysaguire Image by Tracie Ysaguire |
Want some more birthday or party craft fun? How about crafting a noise maker with toilet paper or paper towel rolls!
Decorate your toilet paper or paper towels rolls with stickers or markers.
Cover one end with some tissue a paper and tape it around the roll.
Next, fill it with a handful or two of macaroni noodles.
Cover the other end of the roll with another piece of tissue paper and tape or glue it around the roll.
Now shake it up!
We hope you and a your kids enjoy making these crafts for your next birthday or party event! If you make these crafts, please share your crafty creations with us!
We would love to see them!
|  Image Created by Tracie Ysaguire via CanvaPro Image Created by Tracie Ysaguire via CanvaPro |